My name is Brooke Willis and I am currently a student at SAE, studying a Bachelor of Animation. I have had a huge interest in writing stories and creating cartoon characters ever since I could put pen to paper (or crayon to wall). When I realized this was something I could do professionally it immediately became my dream career. I've only just begun to learn the ropes of 3D max, but I'm hoping with a bit of persistence I'll eventually master the mysterious realm of 3D animation.
This trimester I feel like I have made significant progress in improving my skills in many areas of my craft. I have also discovered there is a lot left to learn, so in this blog I will be reflecting on areas I want to improve in the future and how I will go about achieving this.
Sculpting
This tri I briefly touched on the subject of sculpting in Z brush when I made a tree stump for the World Builders project. I really liked the result this technique produced as compared to simply modelling in 3DS Max. Although, Z brush was a very alien program to me and I merely scratched the surface in what I could do with it. Ultimately I’d love to be able to sculpt a character in the program so to do that I first need a better grasp on the basics. Below are a few tutorials I aim to use to help my learning in this area.
Creating Realistic Textures
Another new area I looked into recently has been different texture maps and using Substance Painter to create more realistic objects. This studio I have focused a lot on hand painted textures for cartoony characters, so now I’d like to get better at realism more suited for games. I’ve already found a few tutorials that focus on this and I would like to practice texturing some smaller non-organic models to train my skills.
Rigging
This is an area I definitely want to improve on and will be working on in the holidays. I am going to be rigging the characters for our final project in Maya, and the rig needs to be suitable to bring into Unreal Engine. Over my break I will be more extensively researching and practicing this but to start off with I have a few tutorials which I will look into.
For my model I decided I wanted the textures to be hand painted in order to give her a real cartoony- stylized feel. This hand painted style texture is a stylistic choice games studios are really starting to embrace. Basically what hand painted texturing means … Continue reading Research Blog 3: Hand Painted Textures
Hey guys! I recently completed my 3D character model from my original reference concept While I was modelling I developed her character a lot more and made some changes to her appearance along the way. I ended up calling her ‘Mary the Monster Hunter’. She’s … Continue reading Specialization Project: Completing the Model
Character modelling has always been an unexplored area for me. In the past I have created a few basic models with the limited knowledge I had, but had always been a bit scared to venture further into this field. Frankly, the topology of organic and … Continue reading Research Blog 2: Character Modelling
For my cross-discipline work I decided to work with a Studio 1 games group, on their comedic, Swedish-themed game ‘Snöfyr’. I thought the idea for their game was very fun, the premise for the game is as follows;
‘The lighthouse is frozen and must be uncovered in order for it to function. The kids throw themselves down the mountain and become snowballs gaining size to smash into the lighthouse and uncover the ice.’
It’s a three player game where everyone takes turn to roll themselves down the hill, trying to pick up as much debris and speed as possible before reaching the lighthouse at the bottom. The art style the games students requested was a simple low poly with hand painted textures using mostly flat colours.
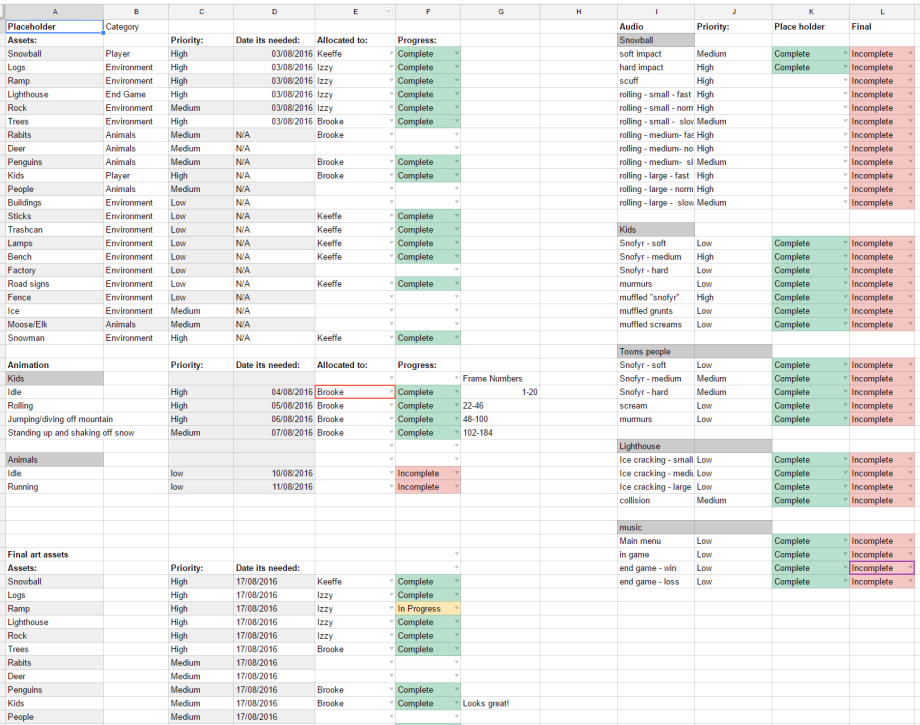
To stay organised our team used a google docs spreadsheet to keep track of our assets and when they needed to be completed by.
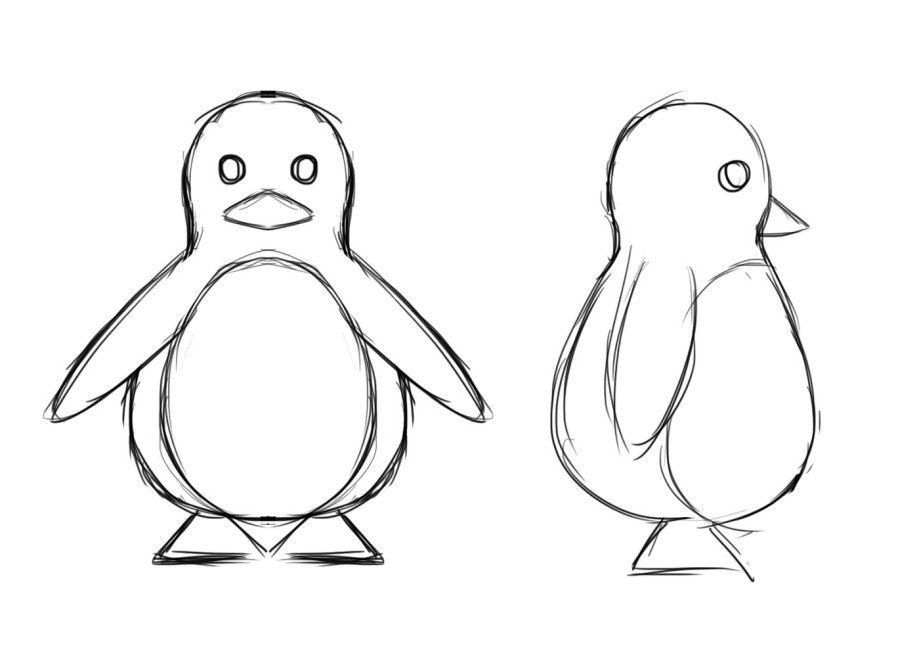
I volunteered to do the characters and penguins, as these where more organic assets I made some quick model sheets before I started modelling.
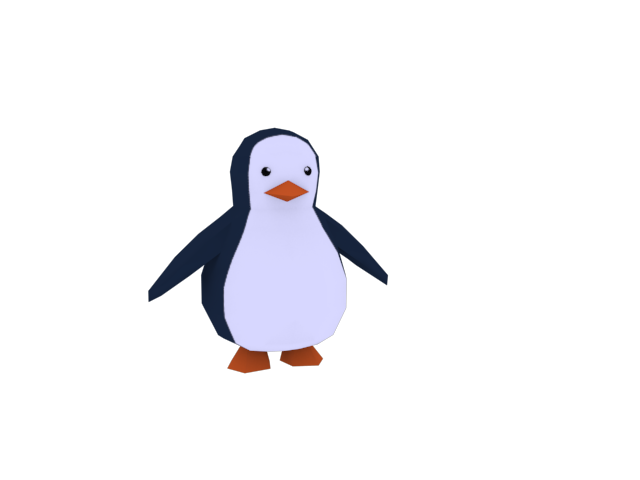
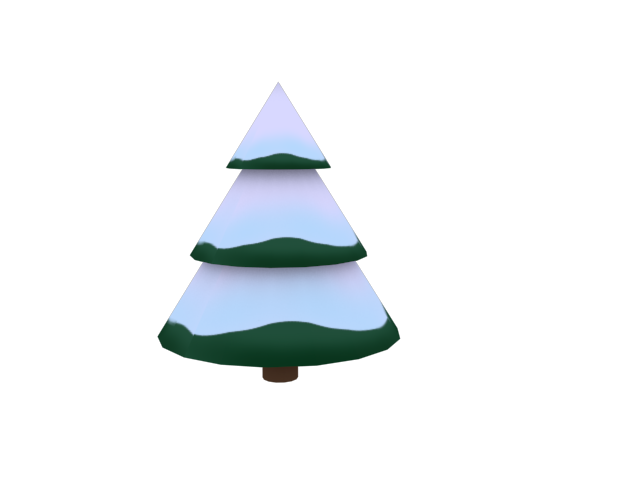
Here are all my modeled and textured assets I made for the game.
As well as modelling I also did a bit of animation for the playable character! This was good for me as I didn’t really know how to export animations for games which required a bit of research to get them to work in the engine. Below are the final animations exported from 3DS Max.
After completing my research blog on character design I dove into actually creating my own character. At the beginning I wasn’t really sure what I wanted to model, only that I wanted to do a little girl that was a little bit dark and creepy. To … Continue reading Specialization Project: Character Design
During my time at SAE I have discovered my favorite part of the animation process is actually pre-production – the character/environment design, writing scripts, etc. So for my specialization I definitely wanted to have a go at creating an appealing character design for my model! This … Continue reading Research Blog 1: Character Design
This trimester I’ve begun pre-production for my final project with a small team of two other animation students; Isabel Fernandez and Josiah O’Keeffe. I have been working as Art Director and have spent a considerable amount of time on the concept stages of … Continue reading Final Project: Concept Work 1
So the Darksiders World Builders project has drawn to a close and overall I believe it was quite successful. To finish off I will be discussing the processes used and the issues we encountered along to way in one huge blog so get ready.
LO 1 – Positive and Negative Issues
For this LO I am going to reflect on both the positive and negative events and issues which impacted on this project.
Lack of communication on Slack
Our group chose Slack as our main method for communication during the project, but despite this there wasn’t nearly enough talk within the program. Personally I believe this was due to the fact we where divided into smaller teams to work on different scenes. Most of the time I only communicated with the team member I was collaborating with and this was on facebook as it was more direct messages. I believe the rest of the team also had this mindset and was focused on their own individual scenes rather then talking a lot with the group as a whole. While everyone finished on time the project could have been more cohesive had we utilized slack more. To avoid this happening in future projects, from the start a weekly schedule needs to be established and then followed. If we made a point of having at least one scheduled discussion per week where we showed what we’d done and asked for feedback that would have improved our end product even more.
Not following the project methodology well enough
From the start our team decided we would follow the Agile methodology, yet after a couple of weeks we began drifting away from it’s structure. I think this was due to communication not being as good as it could be and team members likely forgot about it in the midst of their work. We did get all our deliverables done on time but if we followed our methodology of integrate and test more appropriately we would have ended up with a higher quality product. In future teams I will be sure to put more focus on maintaining a good methodology and not slacking off in it’s processes later on in the project.
Positive Attitude & Good Problem Solving Skills
When our team did communicate however it was always in high spirits. Everyone had a good attitude to work and each other within the project. If anyone was having a technical problem they would seek out their other team members to get answers. I did this a lot when talking to the member I was working with but admittedly could have utilized Slack more and sort help from more of my team mates. I can in all honesty say that this was the most positive team I have worked with in Studio.
LO 2 & 3 – The Creative Processes and Project Methodology
To begin the project our team first brainstormed ideas together until we had something we where happy with and then decided on team roles and project methodology. The methodology we went with was Agile as it involves a lot of integrate and test, back and forth until the project sees completion- which we believed was an effective way to keep the group coherent, especially since we where dividing into smaller sub-groups to work on individual scenes.
To start our development we created documentation explaining clearly what each team member needed to do and by when. We set up communications on Slack and put together a mood board on pinterest as a way of developing a clear style. From there concepts where made by each member as well as a scene mock up and then presented to the client (our studio facilitators). We received a lot of feedback from this which we reviewed as a team in a meeting afterwards and decided on appropriate changes. We then re-did concepts as necessary and began creating the assets for our scene.
For all my assets I would create concept art for them first, I would then model the low poly from this. I would then either create a high poly model from this or bring the object into z brush to sculpt for more organic forms. I then used the projection tool to create a bump map while still using a model that was low poly.
While we where creating scene assets we showed a pre-vis to our client using the assets we had completed and place holders for the ones we had not. We again got feedback from this process and went back to incorporate the changes necessary while moving on to texturing. Our group agreed we would use 2K texture maps; diffuse, bump, metallic and roughness. These would then be tested in unreal. If any where not behaving correctly they would be taken back into substance painter. After they had been put back in Unreal and working correctly they would be put on the drive for all team members to have access to. They would then we composited into Unreal Engine with camera movements then added. This was rendered out and giving to our team lead who edited all the shots together along with a soundtrack to create our final product.
LO 4 – Execute a Project in accordance with a project plan
Overall I do believe we used this methodology as we worked in a constant cycle of integrate and test. Our project was also visible to the client throughout. Our project plan was referred to and reviewed during the project; especially in the first couple of weeks, but it was definitely something we should have returned to even more in the later stages. I believe we did not do enough cycles of our Agile method which is something to improve on in future projects. In saying that we did create milestones and strict deadlines to meet them which we all did. In this regard the project plan was a useful tool in keeping us on track. The risk analysis proved especially helpful as we had team members away and we where prepared to deal with this. The only way we really diverged from the project plan was with the project methodology which I have already covered.
LO 5 & 9 – Meeting the brief
Our final product successfully met the brief as we where on time for each deliverable in the schedule. https://drive.google.com/drive/folders/0B8gFuJ9-DRrxYkVTbjJ6Wm44YVU
We also completed the all important final deliverable; “Students must submit a video of all their shots compiled together into one film. The film must be rendered at 1920×1080 pixels, using the H.264 compression codec. The project files also need to be submitted, such as an Unreal level or AfterEffects files.”
We then presented our product via a gallery walk to our target audience which was fellow students and facilitators.
Below is a link to our final product which meets the requirements of the brief
LO 7 – Develop and sustain effective teamwork skills
Our team worked well together and displayed good team work skills through our communication and general getting along. Everyone was very positive about the project and each other. We kept informed using project documentation and everyone kept in contact to maintain deadlines and keep a consistent art style. Me and Josiah planned out our combined scene so our shots would work together. We also contributed shared assets – he created the wall to appear in both shots and I did the tree stump for his scene.
LO 8 – Communicate the intentions for the project
Our team clearly communicated our intentions for the project via the pitch and pre-screening. As well as through our project plan and art bible.
ANM230.LO01 – Plan and implement large-scale projects, incorporating robust animation workflows
I worked with a supported my team members throughout the project by creating assets and communication with the team. I have already mention my workflow in LO’s 2&3 but I’ll describe it briefly here again
Gather Reference material
Concept Art
Low Poly Model
High Poly Model/Sculpt
Projection modifier to create bump map
Create Colour ID and Diffuse in photoshop
Texture in Substance Painter
Set up models in Unreal Engine
Pass exported scenes to team lead to be edited together
I mainly communicated with my team in face to face meetings but also sort feedback occasionally in Slack. My main communication with team members was through facebook where I sort advice and kept up to date with what was going on with the project.
ANM230.LO02 – Engage in projects involving key stakeholders
For this project our unit co-coordinators where our stakeholders. During the project we met with them on various occasions to discuss our progress. After these meetings we made appropriate changes to our project and project plan documentation.
ANM230.LO06: Reflect on the roles in the animation production process
During this project my role was as a modeler, sculptor and texture artist for one of the three scenes in this project.This came with a lot of new challenges for me as I am not the most experienced in the techniques and programs I chose to work with. Sculpting the tree stump was something I hadn’t tried before and I needed to do some research in order to find my way around Z-Brush. The end result was achieved much faster and to a higher quality then I could have done with my skills in modelling alone.
Modelling the sword was a more complex asset then I was used too and it took me the most time to create. I had a lot of technical issues which slowed down my production time considerably. It was definitely a good project to learn from as in the end I was much better educated in shortcuts and ways I can model more efficiently. I believe that from this project my models in the future will improve dramatically as if anything I gained a lot of confidence in my own abilities from challenging my current skill set.
To texture all my assets I used a combination of hand painted textures and Substance Painter. I am quite comfortable with hand painting but Substance was another new program for me to get my head around. Playing around with different textures types was a lot of fun but still difficult for me to get looking just right. I don’t believe this was my strong point and is definitely something I can continue to learn and expand my skills on in the future.
My overall output I believe was not as good as it could have been. I hold myself personally accountable for not communicating as much as I needed to and therefore not being able to contribute as much as I would have originally liked to the group. There was definitely a lack of team coherency and therefore motivation which effected the overall end product. In future projects I can definitely improve my performance by being a more active team member and inspiring others to work together as a team.
After I finished the previs I have been working on asset production. I didn’t have many assets to produce so I wanted to make sure I did a great job of them.
Scene Mockup
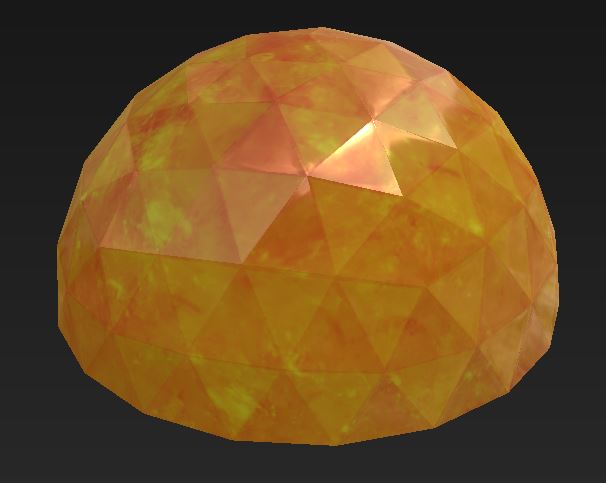
Crystal Tent
The tents where the easiest asset to complete as they where just half spheres, but spent most of my time on this asset creating a texture that would resemble crystal. I used image overlays of amber crystal as well as hand painting to create the diffuse layer and then added metallic and roughness maps to it in substance painter.
Diffuse MapFinal Image
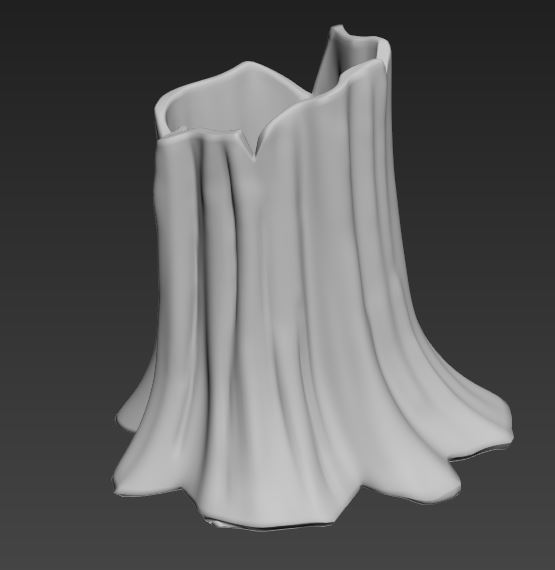
Burnt Tree Stump
The next asset I made was the tree stump. I have recently acquired Z-brush which I used a bit on the holidays and was keen to give sculpting a go so I could achieve a more organic look. As I am still new to sculpting I thought it would be easier to first create a base mesh in 3DS Max and then take it into sculpting. This turned out to be very successful and I was very happy with result. I then used projection mapping to bake out the normal map to bring into substance painter. In Substance Painter I tried to texture it to look as though it had been charred on the inside, for this I used reference images to get the look I was after.
Low Poly MeshHigh Poly SculptTextured Model
Angel Sword
The Angel Sword was the hardest model for me and the one I had the most problems with. I used a lot of reference from different sword to create a concept I was happy with and fit the angelic theme. I wanted it to be something a soldier could use while at the same time looking ornate to reflect the Angel’s magic and attention to detail as described in the original passage. This was the concept I finally decided on. I only did it as a rough sketch as I feel I spent too much time on the concept phase and was keen to get into modelling.
As with the tent and tree stump I used the technique of baking the highpoly onto the lowpoly . This was something I was not too comfortable with before but can safely say I know very well after completing this project. I had a fair few issues with the bake for this model, the smoothing groups didn’t seem to work in some areas. In the end I just re modeled those parts and the normal map turned out fine. In photoshop I created a colour ID map to help with texturing. I then used a combination of hand painting and substance painter to get the final look of my sword.